
今回はWordPressをubuntu26.04にインストールします。
LAMPのインストール
LAMPとは
LAMPをインストールします。
L=Linux ここではubuntuserver26.04を使います。
A=Apache
M=MariaDB(データベース)
P=PHP
今回の仕様(通常パスワードはもっと複雑なものを設定します)
| MariaDBのrootパスワード | root-pass | ① | |
| WordPress用データベース名 | for_wp_database | ② | |
| ②用のユーザ名 | wpdb_user | ③ | |
| ③用のパスワード | wpdb_user_pass | ④ | |
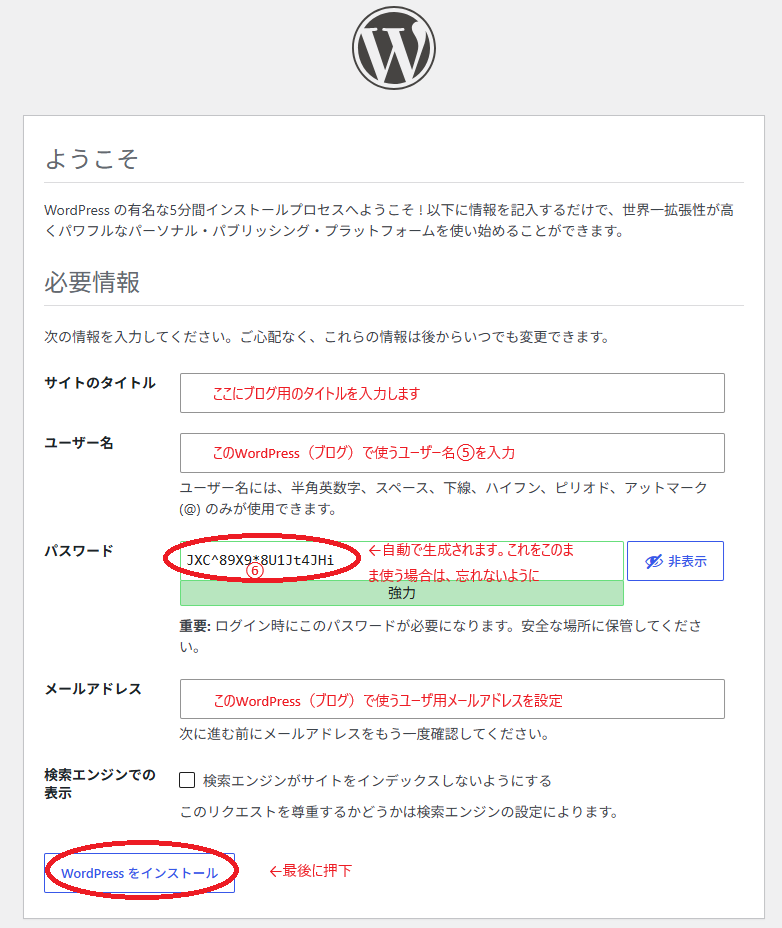
| WordPress(ブログ用)ユーザ名 | ⑤ | ||
| ⑤のパスワード | JXC^89X9*8U1Jt4JHi | ⑥ | |
必要なもののインストール
「Apache2」・・・HTTPサーバー
「mariadb」・・・RDBMS(データベース管理システム)
「php」・・・Wordpressを動かすための中心プログラミング言語
$ sudo apt install apache2$ sudo apt install mariadb-server* mariadb-client*$ sudo apt install php libapache2-mod-php php-mysql php-curl php-gd php-mbstring php-xml php-zip php-intl php-imagickMySQL(mariadb)の設定
mariadbの初期設定
$ sudo mysql_secure_installation  ←左記を入力Enter
/usr/bin/mysql_secure_installation: Deprecated program name. It will be removed in a future release, use 'mariadb-secure-installation' instead

NOTE: MariaDB is secure by default in Debian. Running this script is
      useless at best, and misleading at worst. This script will be
      removed in a future MariaDB release in Debian. Please read
      /usr/share/doc/mariadb-server/README.Debian.gz for details.

Enter root user password or leave blank:

Enter current password for root (enter for none): rootパスワードは未設定のためそのままEnter
OK, successfully used password, moving on...

Setting the root password or using the unix_socket ensures that nobody
can log into the MariaDB root user without the proper authorisation.

You already have your root account protected, so you can safely answer 'n'.


Switch to unix_socket authentication [Y/n] n unix_socket認証を使わないので「n」
 ... skipping.

You already have your root account protected, so you can safely answer 'n'.

Change the root password? [Y/n] Y MariaDBのrootパスワードを設定意思表示
New password: MariaDBのrootパスワード①を入力(とても大切なもののため複雑なものを)
Re-enter new password: もう一度①を入力
Password updated successfully!
Reloading privilege tables..
 ... Success!


By default, a MariaDB installation has an anonymous user, allowing anyone
to log into MariaDB without having to have a user account created for
them.  This is intended only for testing, and to make the installation
go a bit smoother.  You should remove them before moving into a
production environment.

Remove anonymous users? [Y/n] Y 匿名ユーザを削除します
SQL executed without errors!
The operation might have been successful, or it might have not done anything.

Normally, root should only be allowed to connect from 'localhost'.  This
ensures that someone cannot guess at the root password from the network.

Disallow root login remotely? [Y/n] Y リモートによるrootログインを禁止
SQL executed without errors!
The operation might have been successful, or it might have not done anything.

By default, MariaDB comes with a database named 'test' that anyone can
access.  This is also intended only for testing, and should be removed
before moving into a production environment.

Remove test database and access to it? [Y/n] Y テスト用のDBを削除
 - Dropping test database...
SQL executed without errors!
The operation might have been successful, or it might have not done anything.
 - Removing privileges on test database...
SQL executed without errors!
The operation might have been successful, or it might have not done anything.

Reloading the privilege tables will ensure that all changes made so far
will take effect immediately.

Reload privilege tables now? [Y/n] Y これまでのものをリロード
 ... Success!

Cleaning up...

All done!  If you've completed all of the above steps, your MariaDB
installation should now be secure.

Thanks for using MariaDB!
WordPress用のデータベースを作る
mariadbにWordpress用のデータベースを作ります。先ほどmariadbのrootパスワードは設定しましたが、ここではWordpress用のユーザーも設定します。
mysql -u root -p
Enter password:①を入力
MariaDB [(none)]> CREATE DATABASE for_wp_database② DEFAULT CHARACTER SET utf8mb4 COLLATE utf8mb4_unicode_ci;   ~WordPress用のデータベースを作ります~
Query OK, 1 row affected (0.026 sec)

MariaDB [(none)]> CREATE USER 'wpdb_user③'@'localhost' IDENTIFIED BY 'wpdb_user_pass④';
             ~WordPress用データベース用のユーザとパスワードを設定~
Query OK, 0 rows affected (0.002 sec)

MariaDB [(none)]> GRANT ALL PRIVILEGES ON for_wp_database②.* TO 'wpdb_user③'@'localhost';
             ~WordPress用データベースと使用するユーザを紐づけ~
Query OK, 0 rows affected (0.001 sec)


MariaDB [(none)]> FLUSH PRIVILEGES;  ~これまでの設定を反映~
Query OK, 0 rows affected (0.001 sec)

MariaDB [(none)]>exit;  ~MariaDBから出ます~
Bye
.htaccessを有効にする(パーマリンク対応のため)
$ sudo vi /etc/apache2/sites-available/wordpress.conf開いたターミナルに以下をコピペ
<VirtualHost *:80>
    ServerName example.com
    DocumentRoot /var/www/wordpress

    ErrorLog ${APACHE_LOG_DIR}/wordpress_error.log
    CustomLog ${APACHE_LOG_DIR}/wordpress_access.log combined
</VirtualHost>
これらの設定を反映させます。
$ sudo a2ensite wordpress.conf
Enabling site wordpress.
To activate the new configuration, you need to run:
  systemctl reload apache2
$ sudo a2enmod rewrite
Enabling module rewrite.
To activate the new configuration, you need to run:
  systemctl restart apache2
$ sudo apache2ctl configtest
AH00112: Warning: DocumentRoot [/var/www/wordpress] does not exist
Syntax OK
$ sudo systemctl restart apache2.service
WordPressをダウンロード
cd /tmp
wget https://wordpress.org/latest.tar.gz
tar xzvf latest.tar.gz
WordPressの設置場所を変える
$ sudo mv wordpress /var/www/wp-config.phpを準備する
$ cd /var/www/wordpress
$ sudo cp wp-config-sample.php wp-config.php
23行目 define( 'DB_NAME', 'for_wp_database②' );
26行目 ( 'DB_USER', 'wpdb-user③' );
29行目 ( 'DB_PASSWORD', 'wpdb_user_pass④' );
74行目 $table_prefix = 'wp_'; ←この「wp」を任意の文字列に変更するとより良いWordPressのパーミッションの変更
$ sudo chown -R www-data:www-data /var/www/wordpress
$ sudo chmod -R 705 /var/www/wordpress
$ sudo find /var/www/wordpress -type f -print0 | xargs -0 sudo chmod a-x
最終設定
ブラウザからアクセスします。「 http://サーバーのIPアドレス/(またはドメイン)」にアクセス
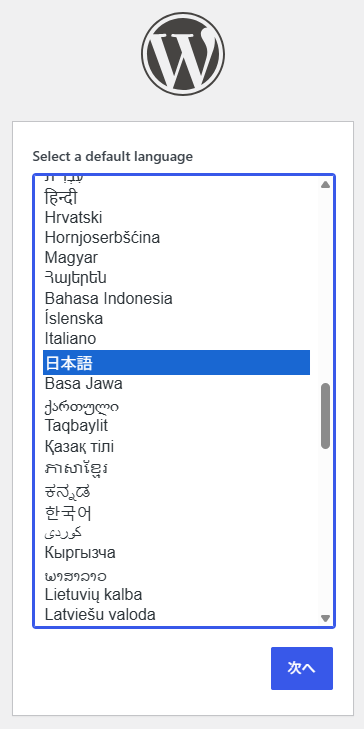
「日本語」
を選択し
「次へ」を押下
WordPressのセットアップ画面が表示されるので、サイト名・ユーザー名(ブログ用)・パスワード(ブログ用)・メールアドレスを入力すれば完了です。
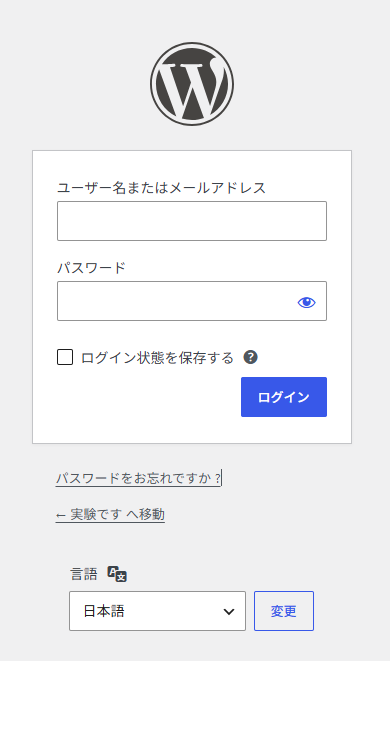
再び「http://サーバーのIPアドレス/(またはドメイン)」にアクセス
ユーザー名に「⑤」
パスワードに「⑥」を入力してログイン
以上です。
参考文献
● Ubuntu26.04LTSにWordPressをインストールする手順
● WordPressのインストール
● WordPressのインストール(Ubuntu18.04)


コメント