
「NextCloud(OwnCloud)のインストール」を作成した時代から10年以上も経ち、状況が大分変わってきましたので、新たにインストールをし直してみました。
ubuntuserver2604にインストールしていきます。
これからは後は、ubuntuserver2604を便宜上「ubuntu」と記載していきます。
サーバーの準備
ubuntuをアップデート
まずはubuntuをアップデートしておきます。
# apt update
# apt upgrade
次に必要なアプリのインストールを行います。
# apt install apache2 mariadb-server libapache2-mod-php php php-mysql php-xml php-mbstring php-curl php-zip php-gd php-intl unzip
# apt install mariadb*
mariaDBの設定(全般)
ここではmariadbというデータベースをを使います。設定は以下の通りとします。
| mariadb管理者(root)のパスワード | adminpass | 本番環境はもっと複雑なものにしてください |
| データベース名 | nextdata | |
| ユーザ名 | nextuser | |
| nextuserのパスワード | nextpass | 本番環境はもっと複雑なものにしてください |
mariadbの初期設定
$ sudo mysql_secure_installation  ←「sudo mysql_secure_installation」と入力
/usr/bin/mysql_secure_installation: Deprecated program name. It will be removed in a future release, use 'mariadb-secure-installation' instead

NOTE: MariaDB is secure by default in Debian. Running this script is
      useless at best, and misleading at worst. This script will be
      removed in a future MariaDB release in Debian. Please read
      /usr/share/doc/mariadb-server/README.Debian.gz for details.

Enter root user password or leave blank:

Enter current password for root (enter for none):  ←Eneterを押下(rootパスワードを削除)
OK, successfully used password, moving on...

Setting the root password or using the unix_socket ensures that nobody
can log into the MariaDB root user without the proper authorisation.

You already have your root account protected, so you can safely answer 'n'.

Switch to unix_socket authentication [Y/n] Y    ←unixsocket認証にするか
Enabled successfully (or at least no errors was emitted)!
Reloading privilege tables..
 ... Success!


You already have your root account protected, so you can safely answer 'n'.

Change the root password? [Y/n] Y   ←mariadbのrootパスワードの設定
New password:                       ←mariadbのrootパスワード「adminpass」を入力
Re-enter new password:              ←確認のため再度入力
Password updated successfully!
Reloading privilege tables..
 ... Success!


By default, a MariaDB installation has an anonymous user, allowing anyone
to log into MariaDB without having to have a user account created for
them.  This is intended only for testing, and to make the installation
go a bit smoother.  You should remove them before moving into a
production environment.

Remove anonymous users? [Y/n] Y  ←匿名ユーザを削除
SQL executed without errors!
The operation might have been successful, or it might have not done anything.

Normally, root should only be allowed to connect from 'localhost'.  This
ensures that someone cannot guess at the root password from the network.

Disallow root login remotely? [Y/n] Y ←リモートでrootログインを許可しない
SQL executed without errors!
The operation might have been successful, or it might have not done anything.

By default, MariaDB comes with a database named 'test' that anyone can
access.  This is also intended only for testing, and should be removed
before moving into a production environment.

Remove test database and access to it? [Y/n] Y    ←testデーターベースを削除するか
 - Dropping test database...
SQL executed without errors!
The operation might have been successful, or it might have not done anything.
 - Removing privileges on test database...
SQL executed without errors!
The operation might have been successful, or it might have not done anything.

Reloading the privilege tables will ensure that all changes made so far
will take effect immediately.

Reload privilege tables now? [Y/n] Y      ←これまでの変更を有効化するか
 ... Success!

Cleaning up...

All done!  If you've completed all of the above steps, your MariaDB
installation should now be secure.

Thanks for using MariaDB!
以上でmariadbの初期設定は終了です。
NextCloudの設定
mariadbにアクセス
mariadbにrootでアクセスします。
$ sudo mysql -u root -p
Enter password:[mariadbのrootパスワード]   ← ここでは「adminpass」
Welcome to the MariaDB monitor.  Commands end with ; or \g.
Your MariaDB connection id is 52
Server version: 11.8.6-MariaDB-5ubuntu0.1 from Ubuntu -- Please help get to 10k stars at https://github.com/MariaDB/Server

Copyright (c) 2000, 2018, Oracle, MariaDB Corporation Ab and others.

Type 'help;' or '\h' for help. Type '\c' to clear the current input statement.
nextcloud用のデータベースの作成
nextcloudで使うためのデータベースを作成します。
MariaDB [(none)]>CREATE DATABESE nextdata; ←「nextdata」というデータベースを作ります
Query OK, 1 row affected (0.001 sec)

MariaDB [(none)]>CREATE USER 'nextuser'@'localhost' IDENTIFIED BY 'nextpass';
                       ←ユーザ名「nextuser」、パスワード「nextpass」のユーザを作成
Query OK, 0 rows affected (0.025 sec)

MariaDB [(none)]>GRANT ALL PRIVILEGES ON nextdata.* TO 'nextuser'@'localhost'
                       ←ユーザ「nextuser」にデータベース「nextdata」へのアクセス権を付与
Query OK, 0 rows affected (0.017 sec)

MariaDB [(none)]>FLUSH PRIVILEGES;    ←設定した権限情報をリロード

MariaDB [(none)]> exit;               ←mariadbから退出
NextCloudのダウンロード
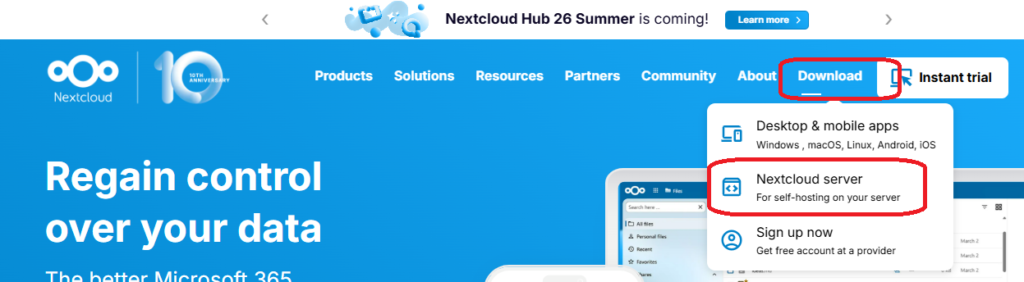
NextCloudのホームページから、「Download」→「NextCloudserver」を選択
「Download server」→「Download server archive」→「Get ZIP file」を押下
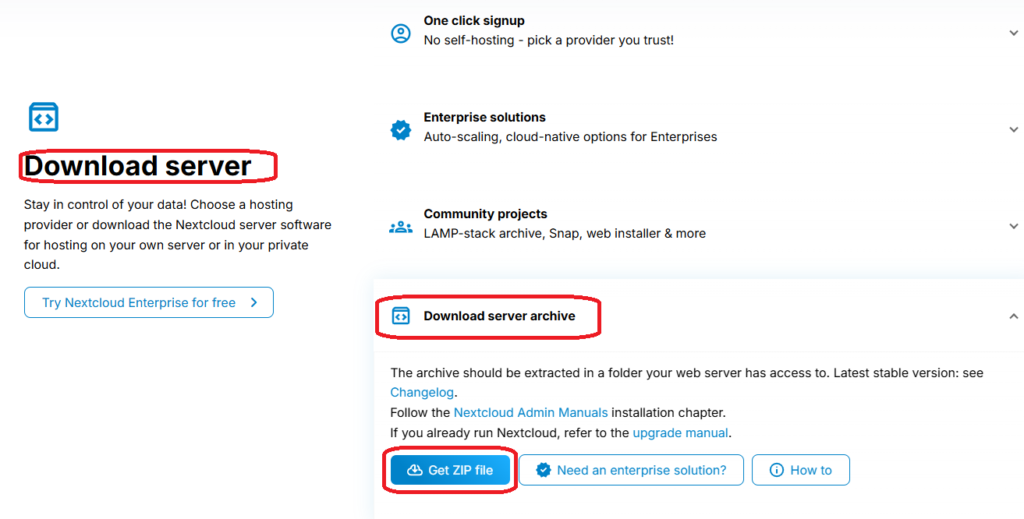
これで「NextCloud」をダウンロードできます。
これをubuntuのコマンドラインでするなら、以下の通りです。
$ sudo wget https://download.nextcloud.com/server/releases/latest.zipnextcloudの配置
nextcloudは「/var/www/」に配置します。
以下のような状態であると仮定して進めます。
$/var/www$ ls -la
total 322120
drwxr-xr-x  3 root root      4096 Aug 12 01:09 .
drwxr-xr-x 14 root root      4096 Aug 11 23:52 ..
drwxr-xr-x  2 root root      4096 Aug 11 23:53 html
-rw-rw-r--  1 root root 329835931 Jul 23 12:26 latest.zip
nextcloudの設定
$ sudo unzip latest.zip
      latest.zipが解凍されて「nextcloud」フォルダが完成します。
$ sudo chown -R www-data:www-data nextcloud
      nextcloudのフォルダ内をapacheユーザ(www-data)が扱えるようにします。
$ sudo chmod -R 750 nextcloud
      nextcloud内のパーミッションを750に設定
$ sudo find /var/www/nextcloud/ -type f -print0 | xargs -0 sudo chmod 640
      nextcloud内のフォルダのパーミッションを640に変更
apache2の設定
apache2はWebServerですが、その設定を行います。
DocumentRootの変更
apache2の初期設定では「DocumentRoot」が「/var/www/html/」になっています。それを「/var/www/」に変更します。
$ cd /etc/apche2/sites-available
$ sudo cp 000-default.conf nextcloud.conf   ←デフォルト設定をコピーする
$ sudo vi nextcloud.conf    ←設定を変更する
<VirtualHost *:80>
    ServerAdmin webmaster@localhost
    DocumentRoot /var/www/nextcloud    ←/var/www/htmlから変更する

    ErrorLog ${APACHE_LOG_DIR}/error.log
    CustomLog ${APACHE_LOG_DIR}/access.log combined
</VirtualHost>
Apacheのモジュールを有効にする
デフォルトでは「000-default.conf」が適用されていますので、それを無効にしてから「nextcloud.conf」を有効にします。
$ pwd
/etc/apache2/sites-available         ←このフォルダにいることを確認
$ sudo a2dissite 000-default.conf    ←「000-default.conf」を無効
Site 000-default disabled.
To activate the new configuration, you need to run:
  systemctl reload apache2           ←一回この指示を無視
$ sudo a2ensite nextcloud.conf       ←「nextcloud.conf」を有効化
Enabling site nextcloud.
To activate the new configuration, you need to run:
  systemctl reload apache2
$ sudo systemctl reload apache2.service    ←apache2.serviceをリロード
nextcloudのインストールと初期設定
以上の設定か完了したら、まずサイトにアクセスします。
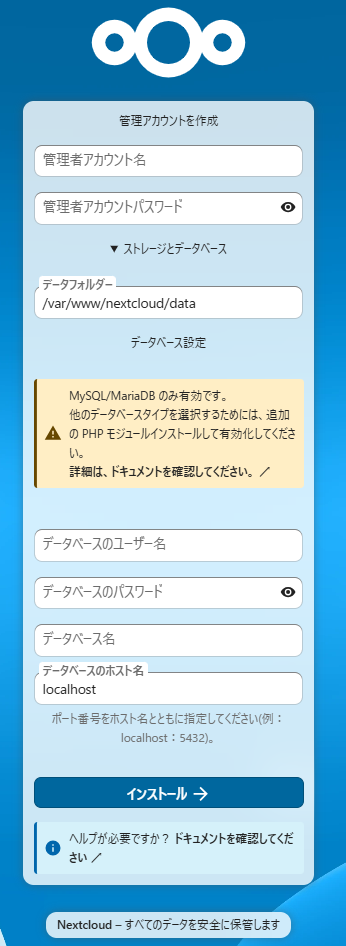
1 管理者アカウント名入力
NextCloudで使用する「管理者アカウント」を設定します。ここでは「nextadmin」とします。
2 管理者アカウントパスワード入力
NextCloudで使用する「管理者アカウントのパスワード」を設定します。ここでは「nextadminpass」とします。
3 データベースのユーザ名入力
先ほどmariadbで設定したユーザ名を入力
「nextuser」
4 データベースのパスワード入力
先ほどmariadbで設定したユーザ名に対するパスワードを入力
「nextpass」
5 データベース名 入力
先ほどmariadbで作成したデータベース名を入力
「nextdata」
6 インストールを押下
しばらく待ちます。1分程度は待つかな・・・
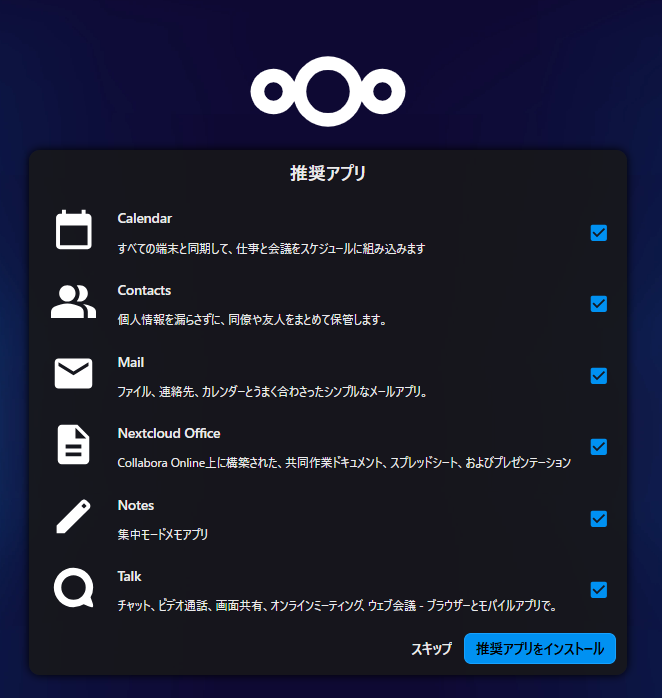
おめでとうございます。インストール完了です。
参考文献:
【構築ガイド】Ubuntu 22.04で始める!自前クラウドNextcloudの導入手順!
NextCloudホームページ
NextCloudインストール

コメント